Sometimes its difficult to propagate African violets by leaf cutting. One example is “chimeras”, where propagation by leaf cutting rarely produces plantlets that will bloom true to description (identical to the plant from which the leaf was taken). Other very genetically unstable varieties, like the most unusual multicolor or fantasy-blossomed varieties can also prove difficult to propagate “true” by leaf cutting
One alternative is to propagate by suckers (shown elsewhere on this site). Another is to propagate by blossom stems. African violets, like most gesneriads, are very easy to propagate in many different ways. Almost any part of the plant can be used in propagation if properly done. Here’s how we do it.

Step 1. Remove open blooms from plant, leaving only peduncles. Grow your plant as you normally would, but remove open blooms from the blossom stem (peduncle), before it fades. Carefully cut beneath the bloom, but above the next pedicle (joint from which another bloom or bud appears).
Doing this does two things. First, it keeps the stem fresh. If all blooms are allowed to open and are kept until spent, the blossom stem will no longer be fresh enough to successfully root later. Also, we intend to produce plants from this stem, not flowers, so we don’t want to discourage blossom production at much as possible–we want the blossom stem, not the blooms!


Step 2. Remove buds and pedicels above leaflets. Each blossom stem will have a pair of “leaflets” that appear on either side of the stem, just below the lowest-most pedicels (at the lowest junction). It is at this point that the stem will eventually produce real leaves. Therefore, cut away all the growth just above this point.
Step 3. Cut blossom stem below leaflets. You will need a small portion of the blossom stem to root, so cut the stem about 1/4″ below the leaflets.

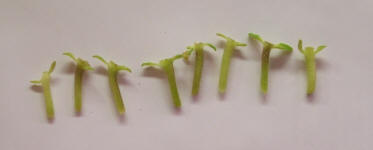
Step 4. The cut blossom stems ready to root.
At far left is the original blossom stem, just after having been removed from the plant, then shown with the cuts made in steps 2 and 3.
At near left are a number of cut blossom stems ready for rooting. Each is about 1/4″ long with one pair of leaflets.


Step 5. Rooting the blossom stems. Fill a small pot with a light, porous, rooting mix. This should contain well over 50 percent of vermiculite and/or perlite. Water the mix so that it is damp, but not soggy.
Next, make a small “pilot” hole in the soil for each of the stems you will be rooting in the pot (shown at near right). This will make it easier to insert the stems without damaging them.
Then insert each of the blossom stems into the holes (shown at far right). Insert them fully, so that the small “leaflets” are at soil level. Be sure the stems are firmly in the soil and aren’t loose or easily dislodged. They will root better if this is so. If you are successful, the stem will root below soil level, and leaves (and a plantlet) will appear at soil level from the “leaflets”.


Step 6. Wait for the plantlets to appear!
At far left is the finished pot of rooted blossom stems. We’ll usually put 6 to 8 stems into a 2 1/4″ pot.
At near left is the a pot of rooted blossom stems about 3 months later, beginning to produce small plantlets. In another couple of months, these will be large enough to root individually.


Step 7. Separate and pot the plantlets.
At near right is a pot of fully sprouted plantlets ready to pot into individual pots. At this point you can pot these plantlets in the same way as you would if they had been produced from leaf cuttings.
At far right is a tray of plantlets after potting, each in its own pot.
8 COMMENTS
- Verlie BlackwellApril 25, 2019 12:36 pmTo me this is quite an amazing Lesson for propagating African Violets that I have learned here today. Please know I am most grateful and can hardly wait to try it. I am 80 yrs. old and hope to live many more years loving my violets. Thank you and Thank God.Reply
- June HamiltonMarch 29, 2019 6:03 pmIn Dec. I ordered 3 plants, 2 minis and 1 standard, not knowing what to expect. I am here to tell you how delighted I am. 1 mini bloomed 3 tiny flowers, and Ma’s Double charm is in full bloom now. How beautiful. Being a widow,living alone, these plants have brought me such JOY. I look at them and say aloud, Life is Good..Reply
- GenevieveOctober 6, 2018 10:09 amI started 6 bloom stems to propagate my a.violets. A week out, I see tiny sprouts developing off the top of the cuttings. The leaflets that remained are still green. I do have them under a grow light 12 hours a day. I didn’t cover them until now, but now they are in their mini greenhouse. Very excited to this point. Thank you very much for you instructions. When I was younger. I couldn’t keep an a. Violet alive little lone start propagating 6 of them. This started with a co-worker giving me an a. Violet in the spring and now I’m up to 4 filling out 6” w x 4.5” deep to rim terra-cotta pots each. I read that the a.violets roots don’t grown down, therefore a shallow terra-cotta pot is best. I also soak mine versus watering from the top. I developed a couple burn spots on one of my violets due to water spilling on it. I’ve learned so much about this beautiful plant and have constant blooms on each plant. Again thank you so much for your tips on propagating them.Reply
- Veronica EvansApril 30, 2018 4:57 pmI have propagated chimeras this way and they turned out perfect sometimes I think the time of year even if you grow underlights temperatures fluctuate in your homeReply
- DonnaJune 18, 2017 5:25 pmI have tried this 3 times and all 3 times they rotted within a week. The second time I made sure the soil was barely damp, they still rotted, the third time I put them in a bag and they rotted. Any suggestions on what I am doing wrong?Reply
- Violet BarnJune 19, 2017 9:18 amSometimes it’s just the blossom stems. Helps if thicker, fresher, and with the tiny “basket” leaves. Some varieties are easier (or not) than others. It also takes some practice. This is yet another reason the the selling price of chimeras is higher–they’re just more difficult (costly) to produce.
- Jere TriggJanuary 10, 2017 2:00 pmI tried this before seeing your article and the two things I did different were that I did not remove as much of the plant tissue above the leaflets and I planted in pure vermiculite. I am getting tiny flower buds forming instead of new leaves on a number of them and wonder if that is normal or if it is related to the two things I did that were different. Also at what point do you begin fertilizing?Reply
- Violet BarnJanuary 10, 2017 2:09 pmSee nothing wrong in the way you are propagating the stems–the results should be similar. I think what you are experiencing is likely normal. After all, we are propagating from blossom stems, so it’s not surprising that some of them will insist on developing buds rather than leaves. The soil used for propagation is lightly fertilized, and we begin regular (normal) feeding as soon as plantlets are potted.